はじめに
今回は既に作ってある簡単なアプリケーションに対してSNSのような機能を追加していこうと思います。
具体的には投稿一覧ページで過去一週間にいいね数が多い順に表示、相互フォロー同士でのDM機能、ページの閲覧数のカウントをする機能を作成していきます。
1.過去一週間にいいね数が多い順に表示
①コントローラへの記述
def index
  to  = Time.current.at_end_of_day
  from  = (to - 6.day).at_beginning_of_day
  @books = Book.includes(:favorites).sort_by {|x| x.favorites.where(created_at: from...to).size}.reverse
  @book = Book.new
end
ハイ。この記述をするだけです。toで今日の日付を獲得し、fromで今日から6日間さかのぼり合計7日間の範囲を作っています。あとはこれでsortをかけてあげれば並び替えが完了します。
2.DM機能
①モデルの作成
rails g model Chat user_id:integer room_id:integer message:text
rails g model Room
rails g model UserRoom user_id:integer room_id:integer
RoomモデルはDMをするための部屋番号を管理し、ChatモデルはChatの内容を管理します。そしてUserRoomモデルはUserとRoomを結ぶ中間テーブルとなっています。
モデルを作成出来たらいつも通りmigrateしましょう。
②アソシエーションの設定
まずはuserから。
has_many :user_rooms
has_many :chats
has_many :rooms, through: :user_rooms
次にRoom
class Room < ApplicationRecord
  has_many :user_rooms
  has_many :chats
end
次はuserroom
class UserRoom < ApplicationRecord
  belongs_to :user
  belongs_to :room
end
最後にchat
class Chat < ApplicationRecord
  belongs_to :user
  belongs_to :room

  validates :message, length: { in: 1..140 }
end
今回は1~140文字内でないといけないというバリデーションをつけてみました。
ユーザーは多くの部屋に参加することができ、ルームは多くのユーザーを持つことができるため、多対多になります。ユーザーとチャットの関係性はユーザーは多くのチャットを投稿することができますが、一つのチャットにかかわるユーザーは一人なので多対一になります。
③ルーティングの設定
resources :chats, only: [:show, :create]④コントローラの作成
rails g controller chatsclass ChatsController < ApplicationController
def show
@user = User.find(params[:id]) #チャットする相手は誰?
rooms = current_user.user_rooms.pluck(:room_id) #ログイン中のユーザーの部屋情報を全て取得
user_rooms = UserRoom.find_by(user_id: @user.id, room_id: rooms)#その中にチャットする相手とのルームがあるか確認
unless user_rooms.nil?#ユーザールームがある場合
@room = user_rooms.room#変数@roomにユーザー(自分と相手)と紐づいているroomを代入
else#ユーザールームが無かった場合
@room = Room.new#新しくRoomを作る
@room.save#そして保存
UserRoom.create(user_id: current_user.id, room_id: @room.id)#自分の中間テーブルを作成
UserRoom.create(user_id: @user.id, room_id: @room.id)#相手の中間テーブルを作成
end
@chats = @room.chats#チャットの一覧
@chat = Chat.new(room_id: @room.id)#チャットの投稿
end
def create
@chat = current_user.chats.new(chat_params)
@room = @chat.room
@chats = @room.chats
render :validater unless @chat.save
end
private
def chat_params
params.require(:chat).permit(:message, :room_id)
end
endこのように作ります。
⑤viewの作成
今回は非同期なのでチャットの部分テンプレートを作ります。
<div class="chat-messages">
  <% chats.each do |chat| %>
    <% if chat.user_id == current_user.id %>
      <div class="message self">
        <div class="message-body">
          <%= chat.message %>
        </div>
      </div>
    <% else %>
      <div class="message other">
        <div class="message-sender"><%= chat.user.name %></div>
        <div class="message-body">
          <%= chat.message %>
        </div>
      </div>
    <% end %>
  <% end %>
</div>
<div class="chat-container">
<div class="chat-topbar">
<h2><%= @user.name %> さんとのチャット</h2>
</div>
<div class="message">
<%= render "chats/messages", chats: @chats %>
</div>
<div class="chat-form">
<%= form_with model: @chat, data: {remote: true} do |f| %>
<div class="errors">
<%= render "layouts/errors", obj: f.object %>
</div>
<%= f.text_field :message, placeholder: "メッセージを入力してください", autocomplete: "off" %>
<%= f.hidden_field :room_id, value: @room.id %>
<%= f.submit "送信" %>
<% end %>
</div>
</div>$('.message').html("<%= j(render 'chats/messages', chats: @chats) %>");
$('input[type=text]').val("")次にバリデーション用のjsファイルも作ります。
$('.errors').html("<%= j(render 'layouts/errors', obj: @chat) %>");今回の非同期ではバリデーションに引っかからず、投稿が成功した場合はcreate.jsを探しに行き、成功しなかった場合にはvalidator.jsを探しに行くような仕様となっています。バリデーションのjsファイルではエラー文のテンプレートファイルを呼び出すように設定しています。
<% if current_user != user && current_user.following?(user) && user.following?(current_user) %>
  <%= link_to 'チャットを始める', chat_path(user.id), class: "ml-3" %>
<% end %>
今回は部分テンプレートにDMへのリンクを置いています。
⑥相互フォローしていないとDMできないようにする
linkは相互フォローの時しか出ませんがURLに打ち込むと別のDMに行けてしまうので、それを対策します。
コントローラに以下を追記します。
before_action :reject_non_related, only: [:show]
・
・
・
private
def reject_non_related
    user = User.find(params[:id])
    unless current_user.following?(user) && user.following?(current_user)
      redirect_to books_path
    end
  end
これでurlでの移動もできなくなりました。
⑦レイアウトを整える
せっかくなので、チャットっぽいレイアウトにしてみましょう
/*
 * This is a manifest file that'll be compiled into application.css, which will include all the files
 * listed below.
 *
 * Any CSS and SCSS file within this directory, lib/assets/stylesheets, or any plugin's
 * vendor/assets/stylesheets directory can be referenced here using a relative path.
 *
 * You're free to add application-wide styles to this file and they'll appear at the bottom of the
 * compiled file so the styles you add here take precedence over styles defined in any other CSS/SCSS
 * files in this directory. Styles in this file should be added after the last require_* statement.
 * It is generally better to create a new file per style scope.
 *
 *= require_tree .
 *= require_self
 */
 .chat-container {
  display: flex;
  flex-direction: column;
  height: 100%;
  max-width: 800px;
  margin: 0 auto;
}

.chat-topbar {
  display: flex;
  align-items: center;
  justify-content: center;
  background-color: #29b6f6;
  color: #fff;
  height: 50px;
  padding: 0 20px;
}

.chat-messages {
  flex: 1;
  overflow-y: scroll;
  padding: 20px;
}

.message {
  display: flex;
  flex-direction: column;
  margin-bottom: 10px;
}

.message-sender {
  margin-bottom: 5px;
  font-size: 0.8em;
  color: #666;
}

.message-body {
  padding: 10px;
  border-radius: 10px;
  max-width: 70%;
}

.self .message-body {
  align-self: flex-end;
  background-color: #29b6f6;
  color: #fff;
}

.other .message-body {
  align-self: flex-start;
  background-color: #f5f5f5;
  color: #333;
}

.chat-form {
  background-color: #f5f5f5;
  padding: 20px;
}

.chat-form form {
  display: flex;
  flex-wrap: wrap;
  justify-content: space-between;
  align-items: center;
}

.chat-form input[type="text"] {
  flex: 1;
  margin-right: 10px;
  padding: 10px;
  font-size: 1em;
  border: none;
  border-radius: 5px;
  background-color: #fff;
}

.chat-form input[type="submit"] {
  flex: 0 0 auto;
  padding: 10px;
  font-size: 1em;
  border: none;
  border-radius: 5px;
  background-color: #29b6f6;
  color: #fff;
  cursor: pointer;
}
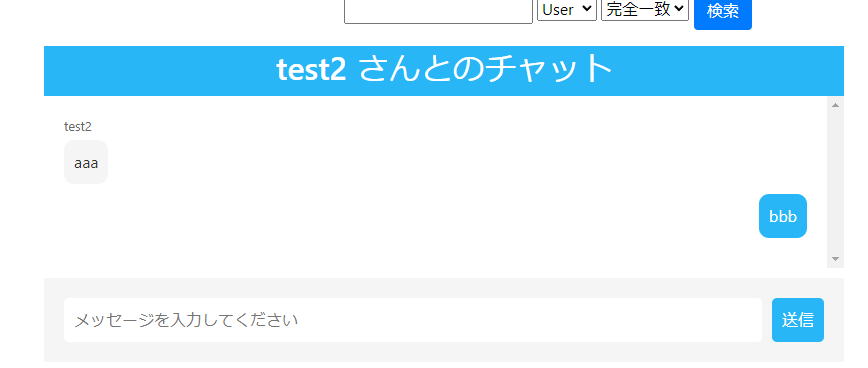
このcssを適用したチャットの見た目はこんな感じになります。

はい。長かったですがDM機能はこれで完了です。
3.ページの閲覧数をカウント
①モデルの作成
rails g model ViewCount book_id:integer user_id:integer閲覧数を数えるためのモデルを用意します。このコマンドを打ったらいつも通りmigrate!
②アソシエーション
belongs_to :user
belongs_to :book
has_many :view_counts, dependent: :destroyhas_many :view_counts, dependent: :destroy③コントローラへの記述
閲覧数を表示したい場所のコントローラに記述を加えます。
def show
    @book = Book.find(params[:id])
    unless ViewCount.find_by(user_id: current_user.id, book_id: @book.id)
      current_user.view_counts.create(book_id: @book.id)
    end
    @user = @book.user
    @new_book = Book.new
    @book_comment = BookComment.new
  end
今回は閲覧数のカウントは一人一回のみにしてあります。
④viewへの記述
あとは閲覧数を出す記述を任意のviewに書くだけで完成です
<td>閲覧数: <%= @book.view_counts.count %></td>おわり
今回はここまで!いやーすごく長い道のりでしたね。特にレイアウトで試行錯誤しましたw
レイアウトにこだわるといくら時間があっても足りませんね。ではまた別の記事で!
